理解muduo之客户端编程 0.前言 本文通过跟踪asio_chat_client程序与muduo网络库,试图回答以下两个问题:
以例程为抓手,理解muduo网络库的工作机制与源码。
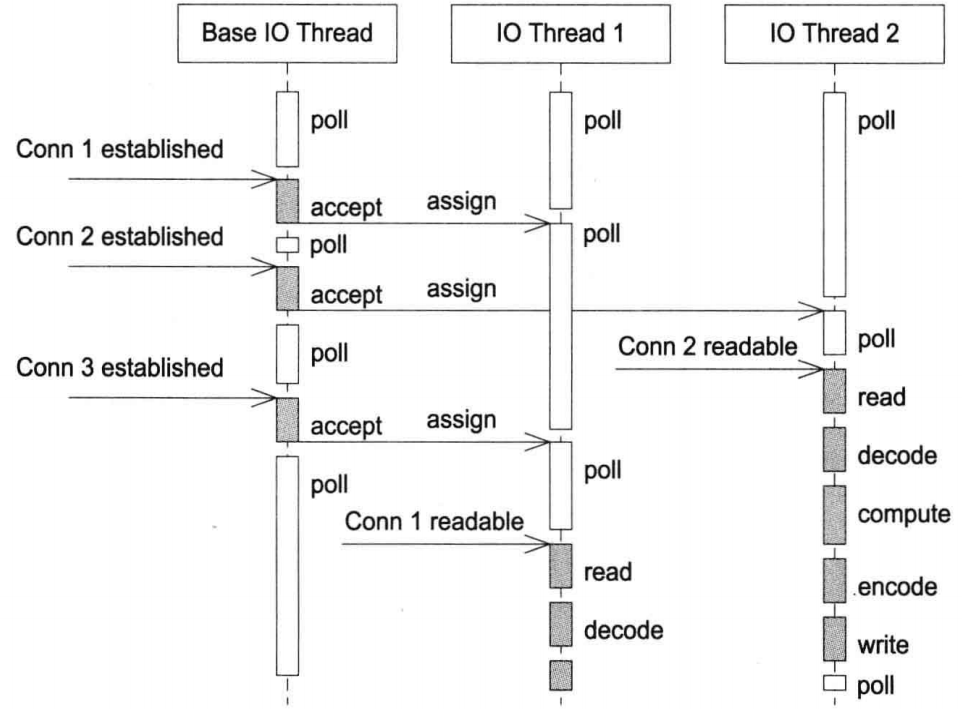
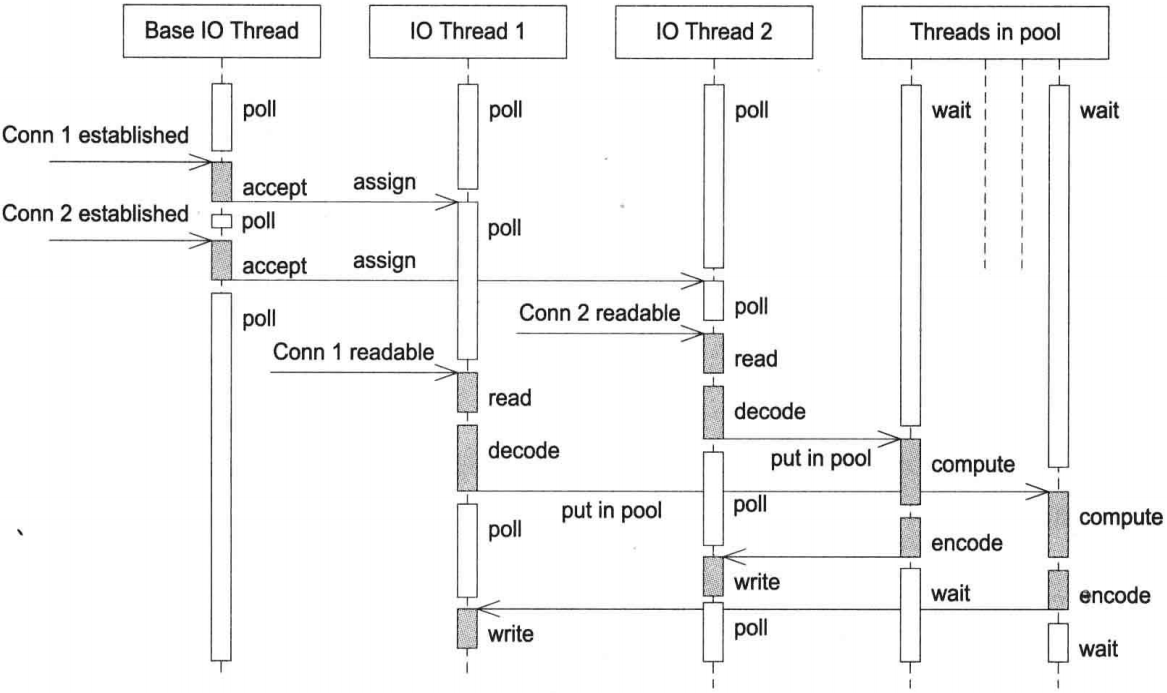
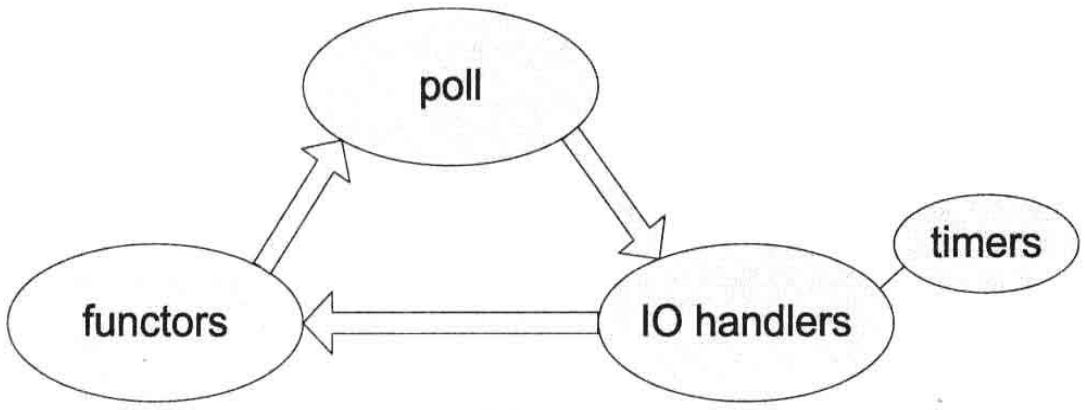
请时刻记住以下几张图,它有助于理解muduo工作机制以及一次循环中各种回调发生的顺序。
muduo网络编程模型之一(默认):多Reactor,即 one loop per thread
muduo网络编程模型之二:多Reactor + 线程池模型(计算线程)
另外2种为:单Reactor与单Reactor+线程池
三者关系
网络编程之Reactor模型
1. asio_chat_client客户端程序 功能:回显,即建立TCP连接后,客户端发送消息,服务端将数据原封发送回来,并显示。
源码如下:
1 2 3 4 5 6 7 8 9 10 11 12 13 14 15 16 17 18 19 20 21 22 23 24 25 26 27 28 29 30 31 32 33 34 35 36 37 38 39 40 41 42 43 44 45 46 47 48 49 50 51 52 53 54 55 56 57 58 59 60 61 62 63 64 65 66 67 68 69 70 71 72 73 74 75 76 77 78 79 80 81 82 83 84 85 86 87 88 89 90 91 92 93 94 95 96 97 98 99 100 101 102 103 104 105 #include "examples/asio/chat/codec.h" #include "muduo/base/Logging.h" #include "muduo/base/Mutex.h" #include "muduo/net/EventLoopThread.h" #include "muduo/net/TcpClient.h" #include "muduo/base/Logging.h" #include <iostream> #include <stdio.h> #include <unistd.h> using namespace muduo;using namespace muduo::net;class ChatClient : noncopyablepublic :ChatClient (EventLoop* loop, const InetAddress& serverAddr)client_ (loop, serverAddr, "ChatClient" ),codec_ (std::bind (&ChatClient::onStringMessage, this , _1, _2, _3))setConnectionCallback (bind (&ChatClient::onConnection, this , _1));setMessageCallback (bind (&LengthHeaderCodec::onMessage, &codec_, _1, _2, _3));enableRetry ();void connect () {connect ();void disconnect () {disconnect ();void write (const StringPiece& message) {MutexLockGuard lock (mutex_) ;if (connection_)send (get_pointer (connection_), message);private :void onConnection (const TcpConnectionPtr& conn) {localAddress ().toIpPort () << " -> " peerAddress ().toIpPort () << " is " connected () ? "UP" : "DOWN" );MutexLockGuard lock (mutex_) ;if (conn->connected ())else reset ();void onStringMessage (const TcpConnectionPtr&, const string& message, Timestamp) {printf ("<<< %s\n" , message.c_str ());TcpConnectionPtr connection_ GUARDED_BY (mutex_) ;int main (int argc, char * argv[]) setLogLevel (Logger::TRACE);"pid = " << getpid ();if (argc > 2 )uint16_t port = static_cast <uint16_t >(atoi (argv[2 ]));InetAddress serverAddr (argv[1 ], port) ; ChatClient client (loopThread.startLoop(), serverAddr) ;connect ();while (std::getline (std::cin, line))write (line);disconnect ();sleepUsec (1000 *1000 ); else printf ("Usage: %s host_ip port\n" , argv[0 ]);
2. loop循环的建立
主线程:用来读取输入,下述log中的线程ID:17696
IO线程:处理IO事件,下述log中的线程ID:17697
首先创建loopThread对象, EventLoopThread loopThread,该部分完成的工作是初始化以及绑定线程运行函数threadFunc。
在设置协议族、IP地址与端口后,开始实例化一个对象client。在获得loop后,在构造函数中,设置了连接回调函数、消息回调函数与解编码回调,解编码本文不做描述,读者感兴趣可看源码。
这部分传递2个参数,第一个是loop,即loopThread.startLoop()返回的loop, 第二个是服务端地址。
loopThread.startLoop()这个函数做的工作比较多。
该阶段的运行日志如下:
1
2
3
4
5
6
7
8
9
10
11
12
13
14
fzy@fzy-Lenovo:~/Downloads/03_net_lib/build/release-cpp11/bin$ ./asio_chat_client localhost 18799in thread 17697 - EventLoop.cc:79
3. 如何建立TCP连接 一句话描述:
main函数中的client.connect(),怎么执行到ChatClient中的void onConnection(const TcpConnectionPtr& conn)。以下是具体的过程:
client.connect()将经过到ChatClient, 调用TcpCient中的connect函数,进而调用start函数。
此时调用runInLoop的线程不是loop线程,因此需要进行唤醒, startInLoop实际在doPendingFunctors中执行
1 2 3 4 5 6 7 8 9 10 11 12 13 14 15 16 17 18 19 20 21 void Connector::start () true ; runInLoop (std::bind (&Connector::startInLoop, this )); void Connector::startInLoop () assertInLoopThread ();assert (state_ == kDisconnected);if (connect_)connect (); else "do not connect" ;
在connect中,将创建非阻塞socket以及调用socket connect,连接建立成功后,调用connecting函数,并将sockfd传递给connecting函数。
在connecting中,将建立TCP连接阶段时的写回调,注意,当建立连接后,Channel的回调将转到TCP Connection中。
1 2 3 4 5 6 7 8 9 10 11 12 13 14 15 void Connector::connecting (int sockfd) setState (kConnecting);assert (!channel_);reset (new Channel (loop_, sockfd));setWriteCallback ( bind (&Connector::handleWrite, this )); setErrorCallback (bind (&Connector::handleError, this )); enableWriting ();
enableWriting注册写事件,即触发写事件。
写事件发生后,在EventLoop::loop()中执行currentActiveChannel_->handleEvent(pollReturnTime_),此时会去处理写事件。而在连接阶段,channel中的写事件的回调函数是由connector负责的,即Connector::handleWrite()函数。
在handleWrite函数中,将经历一次removeAndResetChannel(),完成清除channel事件、将channel从epoll中移除、保存建立连接的sockfd(用于后续重新加入epoll)以及重置channel(释放当前指针所拥有的对象,并将channel_置为nullptr)。
注意,这个channel_.reset()是在handleEvent结束后的doPendingFunctors中处理的。
之后处理socket错误,即sockets::getSocketError,它的作用是再次确认是否成功建立连接。若有自连接事件发生,就处理自连接。getSocketError没有错误的话,就设置状态为kConnected,并执行连接回调,即执行 TcpClient中的 newConnection()。
在newConnection()中,最重要的事情就是实例化TcpConnection,并设置TcpConnection的回调函数,其中的连接、消息处理以及写完整回调是由上层应用开发者开发的客户端程序中设置的,比如onConnect()。在这个函数的最后,会执行connectEstablished()。它会重新将channel加入epoll,以及执行应用程序onConnect回调。
至此,客户端与服务端的TCP连接就真正建立了。
1 2 3 4 5 6 7 8 9 10 11 12 13 14 15 16 17 18 19 20 21 22 23 24 25 26 27 28 29 30 31 32 void TcpClient::newConnection (int sockfd) assertInLoopThread ();InetAddress peerAddr (sockets::getPeerAddr(sockfd)) ;char buf[32 ];snprintf (buf, sizeof buf, ":%s#%d" , peerAddr.toIpPort ().c_str (), nextConnId_);InetAddress localAddr (sockets::getLocalAddr(sockfd)) ;TcpConnectionPtr conn (new TcpConnection(loop_, connName, sockfd, localAddr, peerAddr)) setConnectionCallback (connectionCallback_); setMessageCallback (messageCallback_); setWriteCompleteCallback (writeCompleteCallback_);setCloseCallback (bind (&TcpClient::removeConnection, this , _1)); MutexLockGuard lock (mutex_) ;connectEstablished ();
1 2 3 4 5 6 7 8 9 10 11 void TcpConnection::connectEstablished () assertInLoopThread ();assert (state_ == kConnecting);setState (kConnected);tie (shared_from_this ());enableReading (); connectionCallback_ (shared_from_this ());
TcpConnection的构造函数:
1 2 3 4 5 6 7 8 9 10 11 12 13 14 15 16 17 18 19 20 21 22 23 24 25 26 27 28 29 30 TcpConnection (EventLoop* loop,const string& nameArg,int sockfd,const InetAddress& localAddr,const InetAddress& peerAddr)loop_ (CHECK_NOTNULL (loop)),name_ (nameArg),state_ (kConnecting),reading_ (true ),socket_ (new Socket (sockfd)),channel_ (new Channel (loop, sockfd)),localAddr_ (localAddr),peerAddr_ (peerAddr),highWaterMark_ (64 *1024 *1024 ) setReadCallback (bind (&TcpConnection::handleRead, this , _1)); setWriteCallback (bind (&TcpConnection::handleWrite, this ));setCloseCallback (bind (&TcpConnection::handleClose, this ));setErrorCallback (bind (&TcpConnection::handleError, this ));"TcpConnection::ctor[" << name_ << "] at " << this " fd=" << sockfd;setKeepAlive (true );
该阶段日志如下:
1
2
3
4
5
6
7
8
9
10
11
12
13
14
15
16
17
18
19
20
21
22
23
24
25
26
27
28
29
30
31
在连接建立的过程中,我们发现channel经历了加入epoll,又移除,后续又加入的过程。即为什么存在removeAndResetChannel这个函数。
==TODO 解答==
4. 如何发送与接收数据 一句话描述:
main函数中的client.write(line),怎么执行到ChatClient中的void onStringMessage。
4.1 发送过程
主线程读取一行用户输入,调用ChatClient的write方法。最终调用TcpConnection::send()发送数据。关于buffer的处理将在后续专题叙述。
在send方法中,由于此时在主线程上,因此需要唤醒IO线程,并在IO线程中执行发送任务。唤醒与执行如前所述。
1 2 3 4 5 6 7 8 9 10 11 12 13 14 15 16 17 18 19 20 21 void TcpConnection::send (Buffer* buf) if (state_ == kConnected)if (loop_->isInLoopThread ())sendInLoop (buf->peek (), buf->readableBytes ());retrieveAll ();else void (TcpConnection::*fp)(const StringPiece& message) = &TcpConnection::sendInLoop;runInLoop ( bind (fp,this , retrieveAllAsString ()));
在TcpConnection::sendInLoop(const void* data, size_t len)函数中,如果输出队列上没有数据,将直接将消息发送出去,反之则将数据追加到outputBuffer_。若应用程序设置了写完整回调函数,则会在loop中执行写完整回调函数。
发送结束
1 2 3 4 5 6 7 8 9 10 11 12 13 14 15 16 17 18 19 20 void TcpConnection::sendInLoop (const void * data, size_t len) assertInLoopThread ();if (!channel_->isWriting () && outputBuffer_.readableBytes () == 0 )write (channel_->fd (), data, len);if (nwrote >= 0 )if (remaining == 0 && writeCompleteCallback_) queueInLoop (std::bind (writeCompleteCallback_, shared_from_this ()));
4.2 接收过程
epoll触发读回调
执行 Channel::handleEventWithGuard,并根据事件回调类型选择具体回调函数,本次Wie读回调处理函数,实际处理函数为TcpConnection::handleRead。
将数据放回到inputBuffer_后,执行消息回调messageCallback_。改回调函数经TcpClient,最终实际执行的是应用程序的消息回调函数。
1 2 3 4 5 6 7 8 9 10 11 12 13 14 15 16 17 18 19 20 21 22 void TcpConnection::handleRead (Timestamp receiveTime) assertInLoopThread ();int savedErrno = 0 ;ssize_t n = inputBuffer_.readFd (channel_->fd (), &savedErrno);if (n > 0 )messageCallback_ (shared_from_this (), &inputBuffer_, receiveTime); else if (n == 0 )handleClose ();else "TcpConnection::handleRead" ;handleError ();
在本例程中,上述代码中的messageCallback_是LengthHeaderCodec中的onMessage, 经过处理后最终回调到ChatClient中的onStringMessage函数。
接收消息并显示,在结束后,loop将继续阻塞在poll处,等待下次事件发生。
该阶段日志如下:
1 2 3 4 5 6 7 8 9 10 11 12 13 14 15 16 helloworld # 继续阻塞在epoll_wait 20230424 05:52:47.288315Z 17697 TRACE poll fd total count 3 - EPollPoller.cc:57
5. 总结 本文的主要内容,在陈硕的《Linux多线程服务端编程》一书中均有体现。陈书全面之余,有些许零散,初次阅读可能会很难从整体把握muduo工作流。因此尝试以应用开发者的角度,跟踪源码,将整个过程串起来。
本文可能有错误之处,敬请批评指正。